Growing Your Own Organic Garden In Containers

Do You Have Bad Soil, Poor Drainage Or Live On A Slope?
If you have any of those problems as listed above? Or is your property on a slope? I have the solution......grow your organic garden in containers.
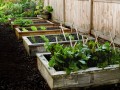
Raised Bed Gardening
Is a simple solution for yards with bad soil or that are on a slope. It's not a new idea and has even been called: Container Gardening or Gardening in a box. So don't let lack of good soil hinder you from being able to grow your garden. You can grow a lot of fresh fruits and veggies in a small area, with soil that YOU choose.
You can feed your family well from just a small raised bed garden or in containers, you choose what works for you. I'll share how I do just that. These beds are inexpensive and easy to build, requiring less time really, than a standard garden.
Follow along here and see just how easy they are to build, plant and harvest.
The Grow Your Garden Accessories Corner - Everything you need and more, all in one place
Get a year 'round start, by using containers to grow your Organic garden vegetables. Just because the bag says 'Potato Tub' doesn't mean you can't grow carrots or tomatoes or whatever in them. Get creative? If you have the space but bad soil or poor drainage or even no space? Growing your Organic garden in containers is easy. Buy a garden tub or a ready made kit----
But...If You Want Old School? - Here's what you need to build your own Raised Bed garden, 'Outside.'

Like to be more hands on? Want to build your own? Before you start building your raised bed gardens, there are a few supplies you will need to gather and prep. Once you have all of these materials, the raised bed will go together in no time.
Materials
Good quality topsoil (dirt) and a compost (I use organic) to fill the box. NO TILLING.
Lumber to build the box, I chose Douglas Fir 2" x 6" sides and ends. 4" x 4" posts (corners) 2" x 2" side stakes to strengthen the box once it is built (you would uses these only if sides are at least 6 feet long) Then I add a roll of chicken wire to cover the bottom of the bed. Why? Moles, rabbits, gophers, you name it.
Finally, enough brown paper grocery sacks or old newspapers to cover the chicken wire mesh in the bottom. Why? Weeds.
The best part of raised bed gardening, is that you can plant earlier and grow longer. The soil also warms faster and easier which allows for earlier planting. One thing to keep in mind is that it dries out quicker, which will require a wee bit of ingenuity to defeat this. A good cover of compost after you plant, to help maintain moisture goes a long way to maintain moisture in the soil, as well as helping to prevent weeds. (I use straw at least 3" deep.)
Or, here are some suggestions for quick assembly raised bed garden containers and a timer controlled drip watering system--


Dimensions I use for my Raised Bed Gardens
4' x 6' Garden Bed
Deciding the size:
A good rule of thumb, when deciding the size of your raised bed garden, is it must be narrow enough to reach across to the middle, from either side. The length of your box doesn't matter but a good maximum is probably 4-6 feet long. Begin by preparing the area you plan to grow your garden, by raking and clearing the soil. Rake it smooth and ensure that it is level.
For simplicity here, I will give you the dimensions of my garden with respect to the amount and type of lumber I used.
Dimensions I use:
My Plot is 4 feet wide and 6 feet long. I used 2" x 6" lumber for the sides, double stacked making my sides 12" high. I chose 4" x 4" posts for my corners for support and strength. To round out my lumber and support requirements, I chose 2" x 2" stakes for my side braces for my 2" x 6" sides and ends and treated wood screws to hold it all together. Armed with this information I descended upon my local lumber retailer and had them cut the following lumber for me. As I said above, I chose Douglas Fir:
Supplies Needed:
( 4 ) 2" x 6"s cut to 6 feet long. (the sides)
( 4 ) 2" x 6"s cut to 4 feet long. (the ends )
( 4 ) 4" x 4" posts cut in 2 foot long sections (for the corners)
( 4 ) 2" x 2" stakes cut to 24" long with an angle cut on one end (for my side bracing)
( 1 box ) treated wood screws 3 12" long (Phillips head)
TOTAL COST for this raised bed garden? Under $40.00
Grow Your Garden With A Sense Of Humor
A weed is a plant that has mastered every survival skill except for learning how to grow in rows.
--Doug Larson
Assembling My Raised Bed Garden - It's really quite easy

In the above photo, you can clearly see the 2' x 6" side pieces already screwed into the 4' x 4" corner posts. (lying flat on the ground) This example will raise the cost of a normal raised bed garden to around $70.00
Tools I use
A portable drill with a Phillips head screwdriver tip and safety glasses, a decent pair of work gloves, a 'T' square and a level.
Setup:
Lay out the pieces in the respective areas where they will be needed. Once everything is in place, start the assembly .
Assembly:
Grab one of the corner pieces ( a 4' x 4") and (a single 2" x 6" x 6' 0" ) Using the 'T' square to ensure that it is indeed square. mount it flush with the bottom of the post with the Phillips Head Screws. Repeat this same process with the other ( 4" x 4" ) end and then the second ( 2' x 4' x 6' 0") sideboard. Once the first side is done, Repeat for the opposite side. Once both sides are fully assembled, it's time to start the end pieces. Take the end piece of one end and begin by screwing it into place (using the T-square to make sure they are level) to the post that the sideboards were just mounted on.
All I need to do now is cover the bottom with chicken wire.
Grow Your Garden Better with Compost - Brands I use
To grow organically, I use nothing but 100% organic fertilizer's and compost. When picking top soil to use, if you are unfamiliar, I've listed THE brand I use and trust.


Final Assembly Steps
Side braces and chicken wire
Why Chicken Wire?
When planning where to grow my garden, I am reminded that maybe like me, you live in an area with gophers, moles or even rabbits. They are habitual burrowers. Well, I have devised a pretty foolproof way to keep them out.
Chicken Wire:
Once the raised bed garden frame is assembled, I flip it upside down and roll out a framework of chicken wire across the bottom (yes, plain old chicken wire) and tack it into place (A staple gun works well also) making sure to tack about two inches apart all of the way around. This will prevent moles or gophers or even rabbits from burrowing underneath and into my garden.
Here's a tip: To ensure extra strength, roll out a second layer of chicken wire across the first and tack into place as well. If you don't have a staple gun, use roofing nails and thin pieces of wood, (similar to paint stirring sticks) to hold the chicken wire in place.
Weed Prevention:
Once the chicken wire is secured in place, re-flip the raised bed garden right side up and lay a fairly thick layer of paper across the entire bottom of the garden. (right on top of the chicken wire) This helps help prevent weeds from growing. I use plain old ordinary grocery sacks cut open and laid flat, but newspaper will work also. Plastic sheeting works best, but is not necessary.
Side Braces:
Time now for the side braces, (ONLY NEEDED if the side boards are 6 feet or longer) to prevent the sides from bowing in or bowing out once the raised bed garden is filled with dirt and compost. When watered, the dirt will weigh a lot. Start by measuring out to the middle of the two long sides of the garden and mark that spot. Taking a stake, place the angle cut to the ground. (like a spearhead) and use a small sledgehammer to drive these stakes down until they are even with the top of side and ends. One screw through each board into the stake should be sufficient to hold the stake to the side. Just ensure that the screw does not protrude through both pieces of wood and out of the wood. If it does, cut or file accordingly.
Everything assembled?
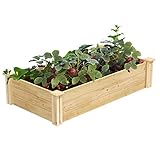
The Raised Bed Garden is now ready to fill with good clean organic top soil and compost. The best part of that? No tilling required.

Filling My Raised Bed Garden
Is there a ratio to go by to grow your garden better?
(Note the side braces in the photo)
Is there a set ratio of soil to compost?
There is really no ratio of mixing soils and compost to grow your garden. Everybody (this includes me) pretty much has their own thoughts. For example, I store my leaves from my trees and then put them in my Wizard Compost bin along with grass clippings, etc. I use that compost mixture, some straw and a bit of good top soil (if you don't have access to good top soil, Scott's Earthgro is excellent) and if you don't have a composter, fear not. Just grab a bag or two of Organic compost, mix in with the rest and there you have it. I have included an evaluation of some Organic Compost and Organic Top Soil that I know and trust, Organic Top soil below and Organic Compost above.).
Use a wheelbarrow to mix
Mix it all ( use more soil than compost) in a wheelbarrow. Once the mixture is right, dump the wheelbarrow full of your freshly mixed combo into the raised bed garden. Stop filling when the level of top soil and compost reaches about 3" - 4" from the top of the garden sides. The reason is, that once the garden planted, the rest of the way up will be filled with straw to help maintain moisture and cut down on weeds.
Simple right?
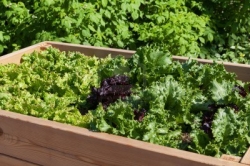
Just plant your veggies, water, cover with straw and get out of the way!